Joined Handwriting for Beginners: How to Learn Cursive Joins
Joining letters usually starts in Year 2, and it can feel confusing if you learnt a different style at school. Here’s what your child is learning, the four types of join, and a ten minute way to practise them at home.
What is joined handwriting?
Joining means linking one letter to the next with a small stroke, so the pencil stays on the paper until the end of the word. Teachers in the UK usually talk about joining, while American schools call it cursive.
UK schools teach one of two main styles:
- Print first, then join. Children learn single letters that start at the top. Later, they add small exit strokes to link them.
- Continuous cursive. Every letter starts on the line with a small entry stroke, so the letters are ready to join from day one. Some schools teach this from Reception.
Both styles work. What matters is that your child uses the same one at home and at school, so ask the teacher which style they follow. If your child’s letters have little flicks you didn’t learn yourself, they’re probably part of the school’s style, so leave them as they are.
When do children in the UK start joining?
The national curriculum in England builds the skill up over several years:
- Year 2: children “start using some of the diagonal and horizontal strokes needed to join letters” and learn which letters are best left unjoined.
- Years 3 and 4: children use these joins and work on making their writing clearer and more even.
- Years 5 and 6: children write “legibly, fluently and with increasing speed” and decide for themselves whether to join certain letters.
The curriculum also says children should move to a joined style once they can form single letters correctly. A Year 2 child who still mixes up some letters doesn’t need to rush into joining.
Does my child have to join every letter? No. The curriculum talks about joining some letters, not all of them. At the end of Key Stage 1, joining only appears in the “greater depth” standard, and even there the wording is to join “some letters”.
Is your child ready to join?
Check these three things first:
- Every small letter starts in the right place and goes the right way round.
- Letters sit on the line and are roughly the same size.
- Your child holds the pencil comfortably, without gripping it hard.
If one of these isn’t there yet, spend a little longer on single letters. Joining badly formed letters makes them harder to fix later.
The four join families
Nearly every join belongs to one of four families. Teach them in this order, two or three letters at a time.
1. Diagonal join to a short letter
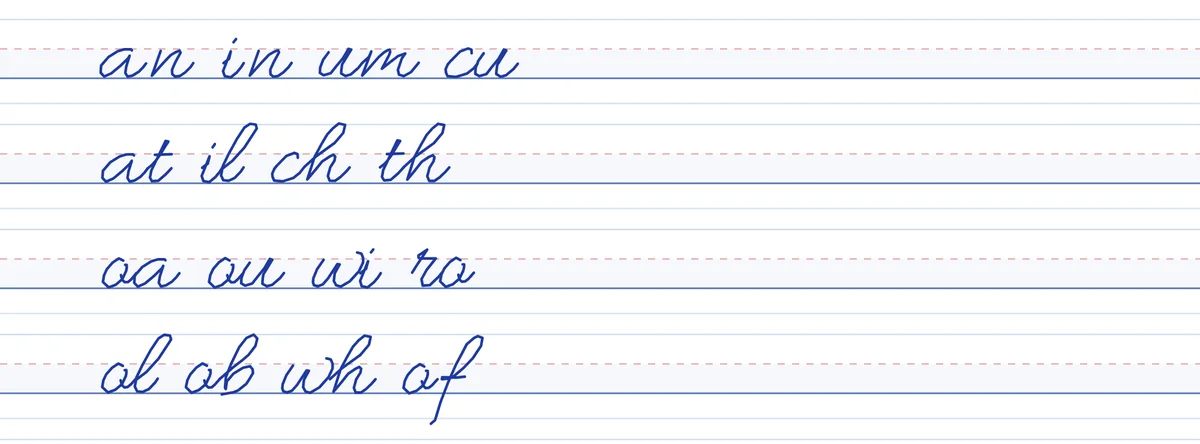
The join runs from the bottom of one letter up to the top of a small letter, as in an, in, um and cu. It builds on the exit flick children already use, so most start here.
2. Diagonal join to a tall letter
This is the same movement, but the stroke climbs higher to reach a tall letter, as in at, il, ch and th. Watch that the tall letter doesn’t shrink.
3. Horizontal join to a short letter
These joins start at the top, from letters that finish there: o, r, v and w. The stroke runs across to the next letter, as in oa, ou, wi and ro.
4. Horizontal join to a tall letter
The stroke runs across from the top, then up into a tall letter, as in ol, ob, wh and of. Children usually find these the hardest, so leave them until last.
Tip: keep the pencil on the paper until the word is finished, then go back to dot the i and j and cross the t and x.
Which letters usually stay unjoined?
- Capital letters. In UK schools, capitals don’t join to the next letter.
- Some letters with tails or curves. Many school styles don’t join from letters such as g, j, y, b, p, x and z. The exact list changes from scheme to scheme.
Your child’s handwriting book may show which letters their school leaves unjoined. If you’re not sure, ask the class teacher.
How to practise at home in 10 minutes
Short, regular practice works better than one long session. Here’s a routine you can follow with our free handwriting repeater online tool:
- Pick one join family for the week. Start with family 1 unless your child’s teacher says otherwise.
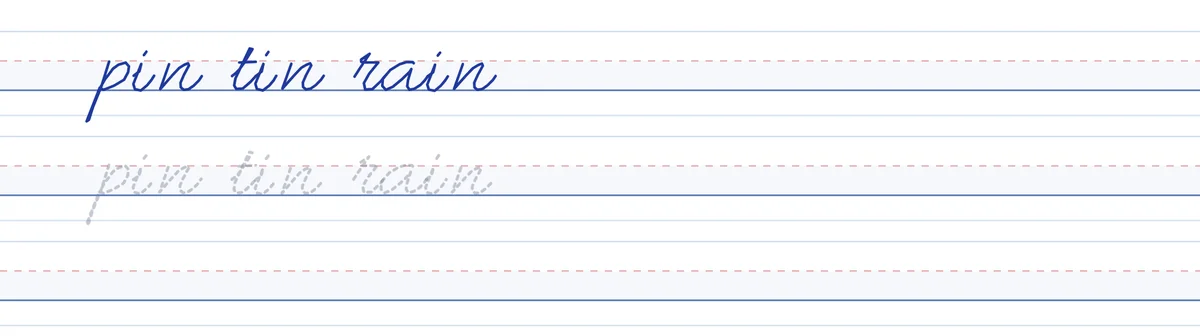
- Choose real words that use it. For the in join, try pin, tin and rain. For ol, try old, cold and hold.
- Watch the words being written. Press Type Text, type the words, choose Joined cursive and set the page to 4-line. Press Rewrite! with the Write Speed on 2 or 3, and watch where each join leaves one letter and enters the next.
- Trace them. Turn on Trace Mode, trace the words three times, then press Check My Tracing to see a score.
- Write them alone. Copy the words onto paper without the dotted line.
- Keep going. Use the same family the next day with new words, and move on when the joins look steady.
Common problems and how to fix them
| Problem | What to try |
|---|---|
| Letters change size once they’re joined | Practise on 4-line paper, so small letters stay inside the middle band. |
| Joins wobble or turn into loops | Slow the replay right down and trace the join on its own a few times. |
| Your child lifts the pencil halfway through a word | Go back to short words of two or three letters. |
| Writing has got slower | That’s normal for the first few weeks. Speed comes back once the movement feels automatic. |
| A left-handed child smudges the page | Tilt the paper to the right and hold the pencil a little higher up. |
| Your child gets upset or tired quickly | Keep sessions to five minutes and stop on a good attempt. If it stays hard, speak to the teacher or the school’s SENCo. |
Frequently asked questions
At what age do UK children learn to join their letters?
Most start in Year 2, when they’re 6 or 7. Schools that teach continuous cursive may start in Reception, while others wait until Year 3.
Do all UK schools teach joining?
Schools in England follow the national curriculum, which includes joining letters, but each school picks its own style and timing. Scotland, Wales and Northern Ireland have their own curricula.
Is cursive writing the same as joining up letters?
Mostly, yes. Cursive is the American name for it, and UK schools usually just call it joining. Here, “continuous cursive” often means the style where every letter starts on the line with an entry stroke.
Should capital letters be joined?
No. In UK schools, capital letters don’t join to the letter after them.
Does my child have to join every letter?
No. The curriculum asks children to join some letters and to learn which ones are best left unjoined. Clear, even writing is the real goal.
Is joining letters faster than printing?
Only a little. Joining helps letters flow and keeps spacing even, but the speed difference is small. Writing that other people can read without effort counts for more.